Manually Extracting WPA2-EAP WLAN RADIUS Certificates
Inspecting RADIUS certificates for target information
- Why should we inspect the RADIUS certificate for the red perspective?
- Why should we inspect the RADIUS certificate for the blue perspective?
- How do we manually extract the certificate
Why should we inspect the RADIUS certificate for the red perspective?
When assessing whether or not it an Evil Twin attack would be viable, assuming the adversary does not want to take a shot in the dark and blind fire their software, they could manually connect to the Access Point (AP) to initialise an authentication process. During the authentication process, the adversary will receive the certificate presented by the RADIUS server.
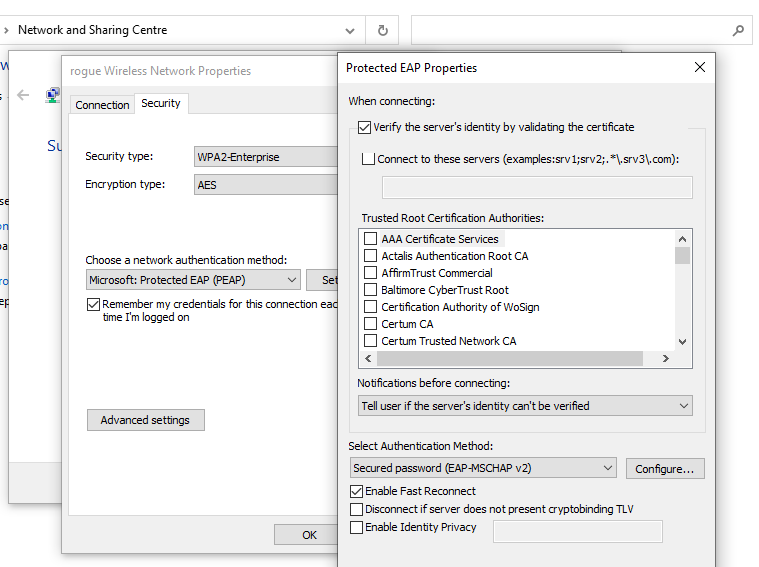
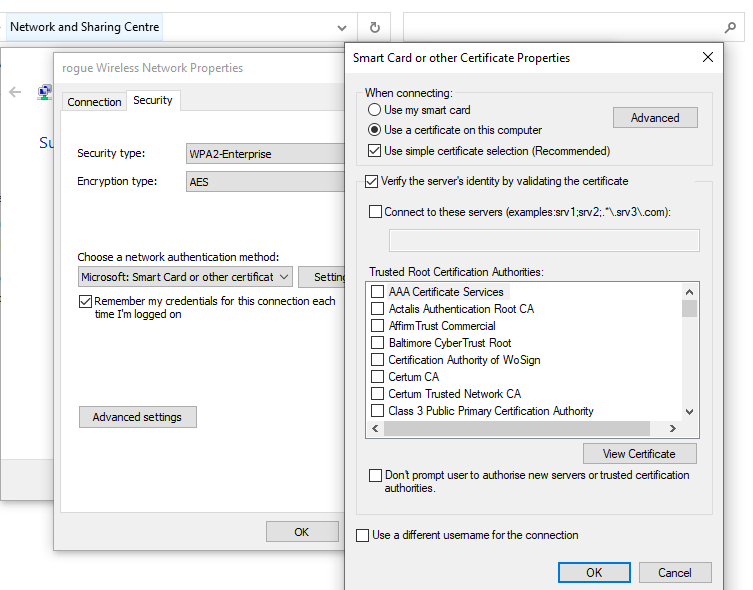
When a certificate is self-signed, it is often a good sign that client devices have not been appropriately hardened to validate the identity of the RADIUS server before transmitting credentials. In fact in this case, it often means a client device has been intentionally made more insecure. As by default for Microsoft supplicants are required to validate the identity of the RADIUS certificate. The following images show the default state of the supplicant for both a EAP-PEAP and EAP-TLS, where both have the Verify the server's identity by validating the certificate.
However, if the extracted certificate has been issued and signed by any of Trusted Root Certificate Authorities (CA), it can be likely assumed that client device would still be vulnerable to an Evil Twin attack. This would be provided that the adversary also generates a certificate that has been signed by a CA that is included in the trusted root CA list by default.
Why should we inspect the RADIUS certificate for the blue perspective?
An organisation could use RADIUS server certificate scraping to detect the presence of a rogue AP. Which in turn could be used to engage manual procedures to hunt for the presence of the adversary for eviction.
Note: Although an adversary could simply conduct an Evil Twin attack outside the target organisations sphere of control to remain undetected, leading to an losing battle for organisations.
How do we manually extract the certificate
In this demonstration, rogue is used to deploy an WPA2-EAP WLAN with a self-signed certificate.
┌──(kali㉿kali)-[/opt/rogue]
└─$ sudo python3 /opt/rogue/rogue.py -i wlan0 --auth wpa-enterprise --internet --preset-profile wifi4 --channel-randomiser --default-eap peap -E all --country AU

[*] Launching the rogue toolkit v3.0.4
[-]
[-] Randomised channel selection is superseding ACS
[-]   Channel 9 was selected
[-] Checking required RADIUS certificate files exist...
[-] Check RADIUS certificate files exist passed...
[-] Launching rogue at: 2023-01-15 05:05:21.930099

[*] Reticulating radio frequency splines...

100%|█████████████████████████████████████████████████████████████████████████████████| 1/1 [00:01<00:00,  1.00s/it]

[+] Creating hostapd-wpe.confg file: /opt/rogue/tmp/hostapd-wpe.conf
[+] Creating radiusd.conf file: /etc/freeradius-wpe/3.0/radiusd.conf
[+] Rewriting the default site file: /etc/freeradius-wpe/3.0/sites-available/default
[+] Creating eap.conf file: /etc/freeradius-wpe/3.0/mods-available/eap
[+] Creating clients.conf file: /etc/freeradius-wpe/3.0/clients.conf
[*] Launching freeradius-wpe
[+] Creating /etc/default/isc-dhcp-server file: /etc/default/isc-dhcp-server
[+] Creating dhcpd.conf file: /etc/dhcp/dhcpd.conf

[*] Starting isc-dhcp-server service.

100%|█████████████████████████████████████████████████████████████████████████████████| 4/4 [00:04<00:00,  1.00s/it]

[*] Launching hostapd-wpe
[*] Enabling IP forwarding
Press enter to quit...wlan0: interface state UNINITIALIZED->COUNTRY_UPDATE
wlan0: interface state COUNTRY_UPDATE->HT_SCAN
wlan0: RADIUS Authentication server 127.0.0.1:1812
wlan0: RADIUS Accounting server 127.0.0.1:1813
wlan0: interface state HT_SCAN->ENABLED
wlan0: AP-ENABLED
As wlan0 is in master mode to serve as the AP, second wireless interface will be needed to serve as the client device. While the second interface will be in managed mode, to connect it to the simulated WPA2-EAP WLAN, it can’t be managed by Network Manager.
Using the following command, Network Manager is told to not control the interface any longer.
sudo nmcli device set wlan1 managed no
Below is a quick overview of the state of the second interface, note how it’s mode of operation in iwconfig is recorded as monitor and it’s control state in Network Manager is unmanaged, this is the target configuration.
┌──(kali㉿kali)-[~]
└─$ nmcli dev
DEVICE         TYPE      STATE        CONNECTION
eth0           ethernet  connected    Wired connection 1
p2p-dev-wlan0  wifi-p2p  unavailable  --
p2p-dev-wlan1  wifi-p2p  unavailable  --
lo             loopback  unmanaged    --
wlan0          wifi      unmanaged    --
wlan1          wifi      unmanaged    --

┌──(kali㉿kali)-[~]
└─$
Next the mode of operation for the second interface needs to be changed to monitor mode.
sudo iwconfig wlan1 mode monitor
The following represents the final target state for the interfaces.
┌──(kali㉿kali)-[~]
└─$ iwconfig
lo        no wireless extensions.

eth0      no wireless extensions.

wlan0     IEEE 802.11bgn  ESSID:"rogue"  Nickname:"<WIFI@REALTEK>"
          Mode:Master  Frequency:2.417 GHz  Access Point: 00:11:22:33:44:00
          Bit Rate:144.4 Mb/s   Sensitivity:0/0
          Retry:off   RTS thr:off   Fragment thr:off
          Power Management:off
          Link Quality=1/100  Signal level=1/100  Noise level=0/100
          Rx invalid nwid:0  Rx invalid crypt:0  Rx invalid frag:0
          Tx excessive retries:0  Invalid misc:0   Missed beacon:0

wlan1     IEEE 802.11b  ESSID:""  Nickname:"<WIFI@REALTEK>"
          Mode:Monitor  Frequency:2.417 GHz  Access Point: Not-Associated
          Sensitivity:0/0
          Retry:off   RTS thr:off   Fragment thr:off
          Power Management:off
          Link Quality:0  Signal level:0  Noise level:0
          Rx invalid nwid:0  Rx invalid crypt:0  Rx invalid frag:0
          Tx excessive retries:0  Invalid misc:0   Missed beacon:0


┌──(kali㉿kali)-[~]
└─$
Once the second interface is in monitor mode, the channel it is operating on needs to be changed to match target WLAN.
sudo iwconfig wlan1 channel 2
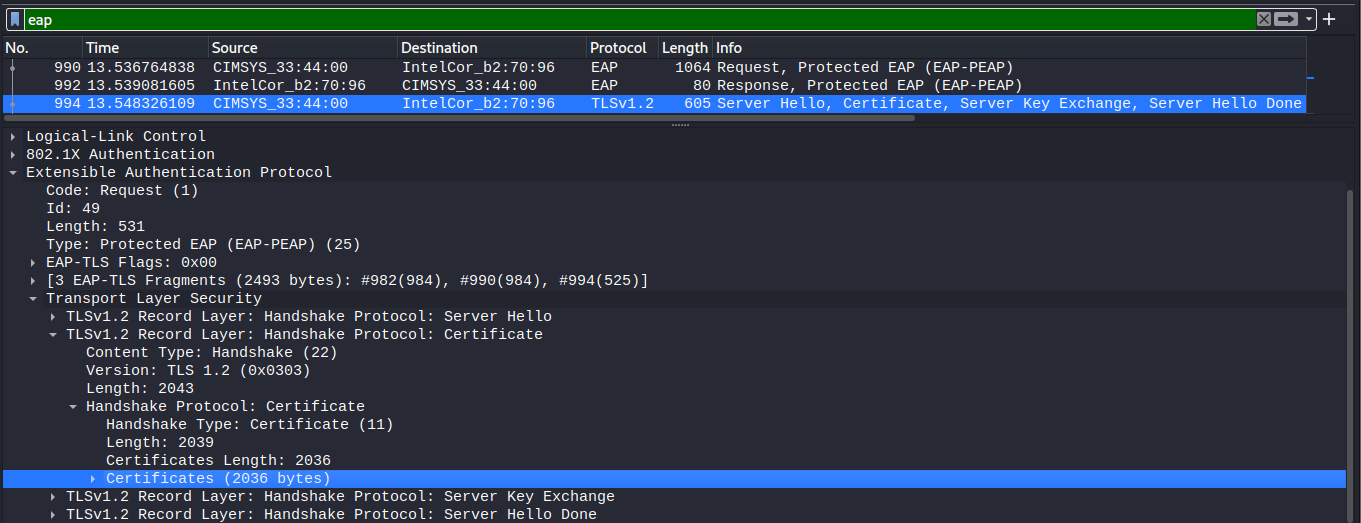
Once the monitoring interface has been configured, launch wireshark and have it listen on the second interface. Then using a (in this demo) third interface, recommended to be a windows device, connect to the target WLAN with any value as the MSCHAP values. This will result in EAP traffic being captured, represented in the image below.
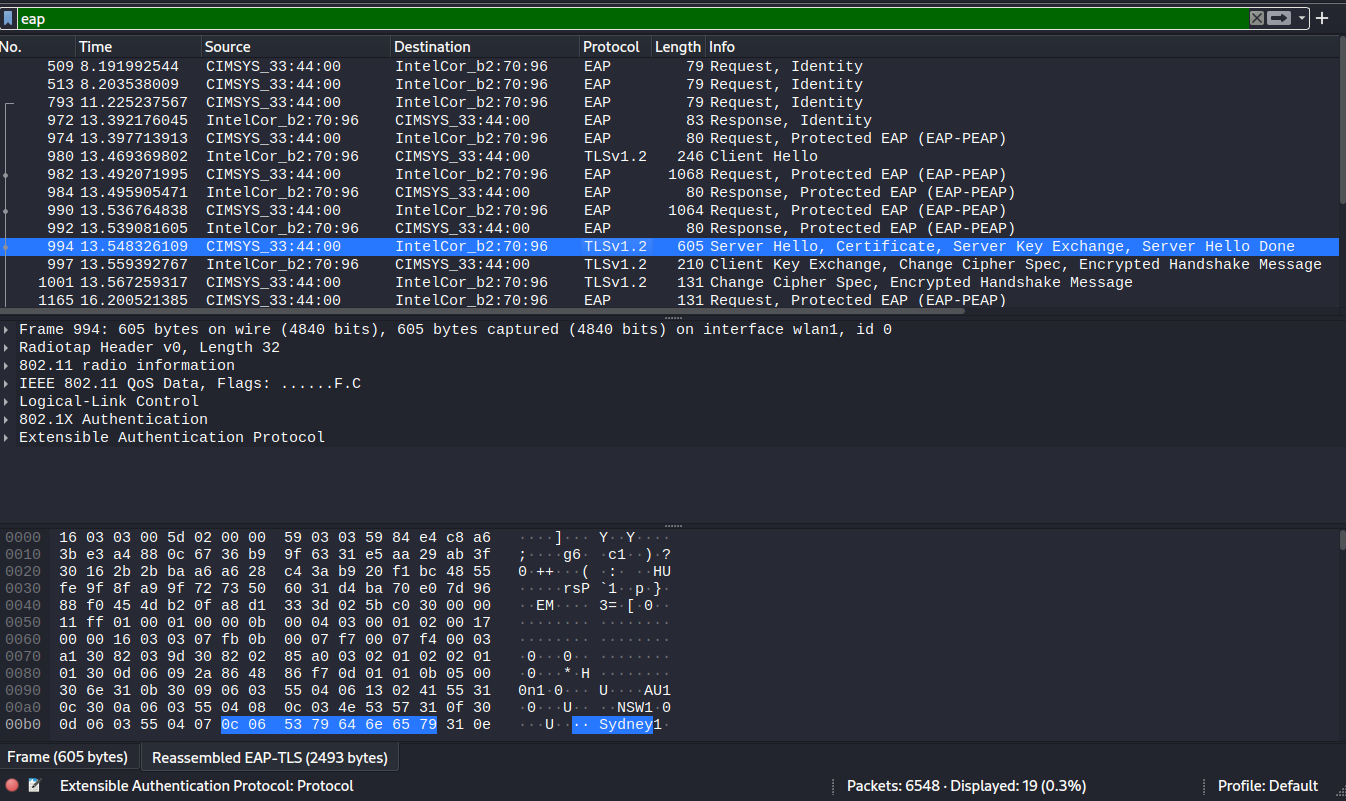
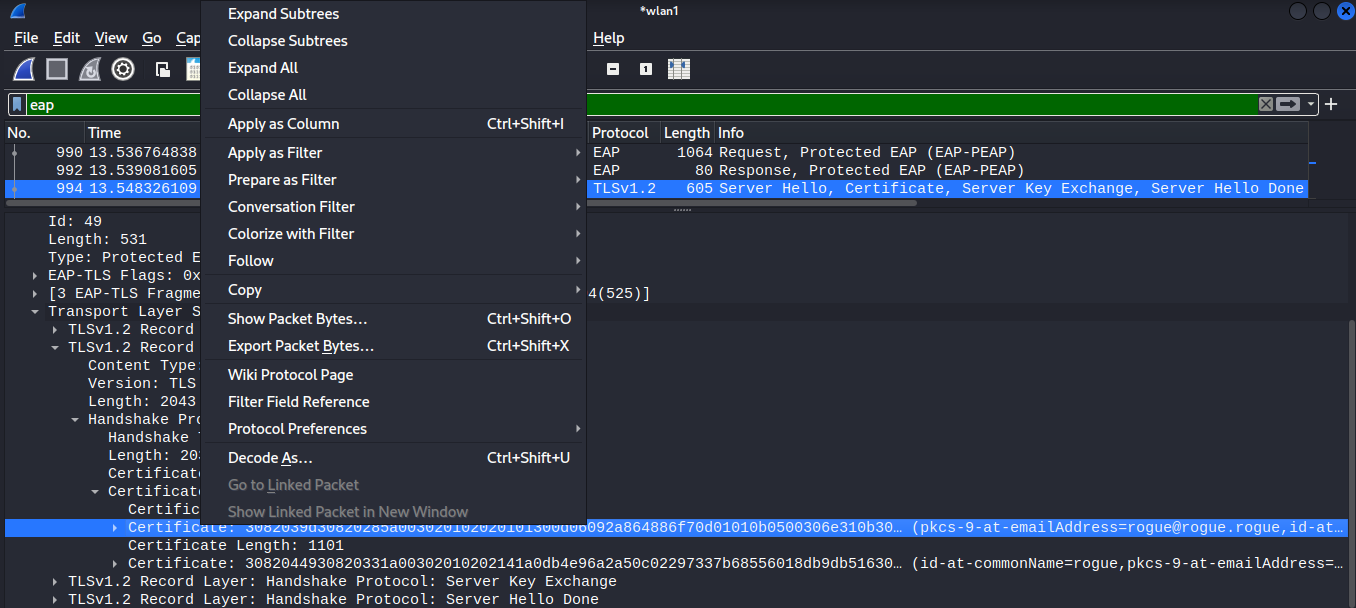
As shown above, identify the Server Hello message, and expand the frame layer viewing tree down to the certificates layer as shown below.

Expand the certificates list, and right-click on each certificate, and select Export Packet Bytes to save the certificate as a file locally.
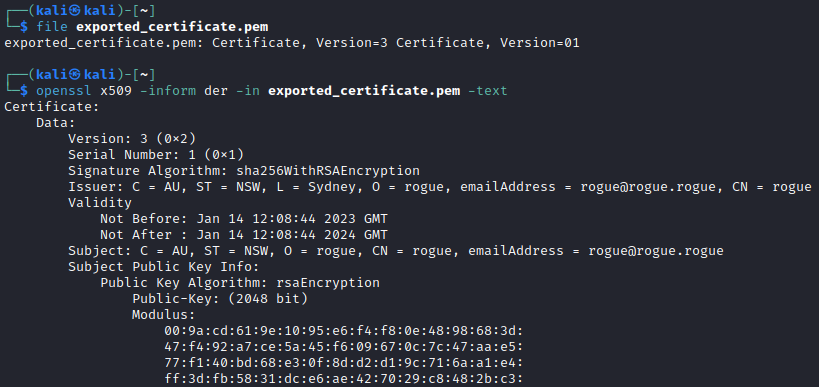
Once the certificate has been extracted from wireshark, the following openssl command can be used to read the certificate.
openssl x509 -inform der -in cert.der -text